How to configure the UTM Web Application Firewall for Microsoft Lync Web Services connectivity
This article explains how to configure your Sophos UTM to allow access Microsoft’s Lync Web Services (the so-called Simple URLs) that require the use of a reverse proxy, through the Web Application Firewall. These services are used by your mobile and clientless users to provide presence, chat and online meeting services. The WAF currently does not support the use of Lync 2013’s mobile voice implementation, and as such, any configurations for these services are excluded from this guide. Configuring your Windows 2008/2012 server or Lync infrastructure is outside the scope of this guide; this article assumes you’ve already setup your Lync infrastructure and that you have copies of your applicable SSL certificates available in PFX format.
Known to apply to the following Sophos product(s) and version(s) Sophos UTM 9.1
Operating systems Microsoft Windows Server 2008 R2 – 2012, Lync 2010-2013
What To Do
- Import the required certificates
While it should go without saying, we’d like to point out that Lync requires the use of SAN certificates for its frontend services, including the Simple URLs. It is therefore highly recommended to import a dedicated Lync SAN certificate into your UTM, even when you may or may not already have a wildcard certificate available for the same domain.
- Go to the “Webserver Protection” menu in the UTM Web admin console and select “Certificate Management”
- Click “New Certificate” and select “Upload” in the “Method:” dropdown box

- Fill in a name, the required password and a comment (if needed)
- Click the folder next to the upload field to select the PFX file you wish to import
- Click “save” to upload the PFX and complete the import
- Optional: Import the root Certificate
In case your PFX file does not include the root certificate you need to manually import it in order for the UTM to be able to use it.
- Go to certificate management and navigate to the “Certificate Authority” tab.
- Click the “Import CA” button and fill in the name, description and type (this should usually be “Verification CA”)
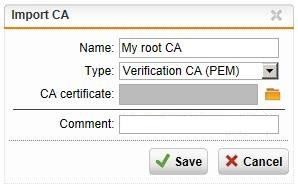
- Click the folder next to the upload field to select the certificate to upload (both PFX and CER format are supported)
- Click save to upload the certificate and complete the import
- Configuring the Firewall Profile
Lync makes extensive use of cookies and dynamic URLs (with loads of parameters) to work properly. Enabling anything related to cookie signing, URL hardening and XSS attacks tends to break Lync’s functionality. On top of that, Lync deals with real-time traffic, and generally takes very unkindly to AV products messing with in-stream data.
- Go to the “Webserver Protection” menu in the UTM Web admin console and select “Web Application Firewall”
- Navigate to the “Firewall Profiles” tab and click the “New Firewall Profile” button
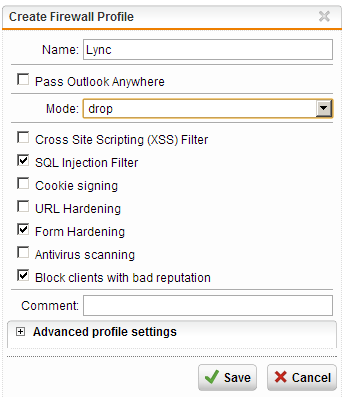
- Fill in a Name for the profile and select the appropriate firewall action (Drop, Reject or Monitor) from the “Mode:” dropdown menu (Monitor logs the traffic and allows it, Reject drops the traffic and informs the end user’s browser, Drop silently drops the traffic)
- Enable the “SQL Injection Filter” and “Form Hardening” options
- (Optional) Block suspect hosts by enabling the “Block clients with bad reputation” feature
- Click “Save” to store the profile and continue
The following screenshot displays our recommended settings:
- Creating the Real Webserver(s)
Lync uses the TCP port used by the client to determine whether the client is internal or external. The external ports are TCP 8080 for externally generated Lync traffic over HTTP and TCP Port 4443 for HTTPS traffic. The clients are unaware of this, so it is of key importance to translate the port number to the “proper” service-associated ports (as we will see later on).
As a result of this setup, we will need to configure two separate profiles for each Lync Frontend server we wish to publish.
Please note that it is currently not possible to load balance multiple Lync Frontend servers through the WAF due to incompatibility between the cookie based persistency used by the WAF and Lync’s implementation of this mechanism.
Lync over HTTP
- Go to the “Webserver Protection” menu in the UTM Web admin console and select “Web Application Firewall”
- Navigate to the “Real Webservers” tab and click the “New Real Webserver” button
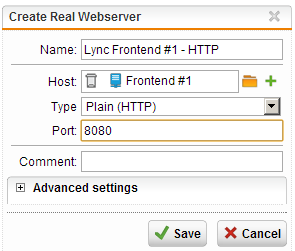
- Fill in a Name for the new Real Webserver and select either a pre-existing Host object by clicking the folder icon or create one by clicking the “+” button
- Set the Real Webserver connection type by selecting “HTTP” from the “Type” dropdown menu
- After selecting the appropriate connection type the UTM will automatically fill in the associated port, which should be changed to 8080 in this particular case.
- Go to the “Webserver Protection” menu in the UTM Web admin console and select “Web Application Firewall”
- Navigate to the “Real Webservers” tab and click the “New Real Webserver” button
- Fill in a Name for the new Real Webserver and select either a pre-existing Host object by clicking the folder icon or create one by clicking the “+” button
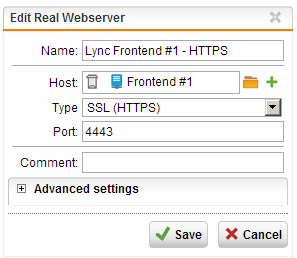
- Set the Real Webserver connection type by selecting “HTTPS” from the “Type” dropdown menu
- After selecting the appropriate connection type the UTM will automatically fill in the associated port, which should be changed to 4443 in this particular case.
Lync over HTTPS
- Creating the Virtual Webservers
As with the real servers, we will also need to configure multiple Virtual Web Servers to enable both
HTTP and HTTPS traffic to the Lync Frontend server.
In our example we use LyncExt.example.com as the Web Services FQDN, Lyncdiscover, Meet and
Dial URLs are unchanged from the default settings in the infrastructure deployment wizard.
Lync over HTTP
- Go to the “Webserver Protection” menu in the UTM Web admin console and select “Web Application Firewall”
- Navigate to the “Virtual Webservers” tab and click the “New Virtual Webserver” button
- Fill in a Name for the Virtual server
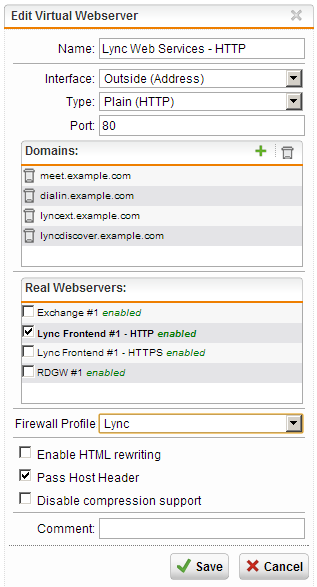
- Select the interface on which this Virtual Webserver should be created from the “Interface” dropdown menu, along with the protocol the end-users should use to connect to this server from the “Type” menu. Since we are configuring the HTTP based services, we select HTTP here. By setting this port to the default value of TCP port 80, we will also automatically enable rewriting of traffic from port 80 (externally) to 8080 (internally), thereby allowing Lync to determine the source of the traffic correctly
- Enter the desired domain names in the “Domains:” list by clicking the “+” button in the top right corner.
- Select the Firewall Profile you’ve created for the Lync HTTP traffic from the “Firewall Profile” dropdown menu
- Enable the “Pass Host Header” option (this setting is very important because the Lync Frontend needs the client to use similar hostnames to the ones configured in the Infrastructure Deployment wizard in order to work properly)
- Click the “Save” button to store the configuration and continue
- Go to the “Webserver Protection” menu in the UTM Web admin console and select “Web Application Firewall”
- Navigate to the “Virtual Webservers” tab and click the “New Virtual Webserver” button
- Fill in a Name for the Virtual server
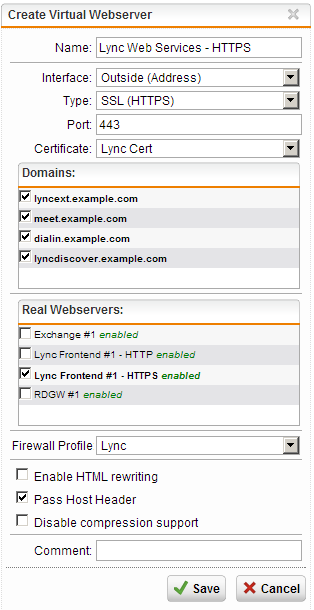
- Select the interface on which this Virtual Webserver should be created from the “Interface” dropdown menu, along with the protocol the end-users should use to connect to this server from the “Type” menu. Since we are configuring the HTTPS based services, we select HTTPS here. By setting this port to the default value of TCP port 443, we will also automatically enable rewriting of traffic from port 443 (externally) to 4443 (internally), thereby allowing Lync to determine the source of the traffic correctly.
- Select the appropriate certificate from the “Certificates:” dropdown menu and select all the applicable names in the “Domains:” list
- Select the Firewall Profile you’ve created for the Lync HTTPS traffic from the “Firewall Profile” dropdown menu
- Enable the “Pass Host Header” option (this setting is very important because the Lync Frontend needs the client to use similar hostnames to the ones configured in the Infrastructure Deployment wizard in order to work properly)
- Click the “Save” button to store the configuration and continue
The following screenshot displays our recommended settings:
Lync over HTTPS
The following screenshot displays our recommended settings: